SIBO Breath Testing Guide: Preparation, Testing and Interpretation
SIBO testing can be a game-changer if you’ve been experiencing bloating, constipation, diarrhea or abdominal pain and suspect SIBO (Small Intestinal Bacterial Overgrowth). Not only does a positive test bring a whole lot of relief and validation for why your belly feels like a balloon full of gas, it also helps guide your next steps with a clear baseline.
But the world of SIBO testing can be pretty confusing. With multiple types of tests, different sugar substrates to choose from and specific preparation guidelines that need to be followed to avoid inaccurate results, many of us are left unsure of where to begin with SIBO breath testing. My goal is to make it all make sense and give you confidence to navigate SIBO testing and interpretation on your own.
Last Updated: June 2025 by Bella Lindemann
Here is what we are going to cover in this guide on SIBO breath testing:
Whether you're testing for the first time or retesting after completing a protocol, this comprehensive guide will help you understand the process, get the most accurate results and allow you to move forward with intervention (if you need it!), with confidence.
Why test for SIBO in the first place?
The symptoms of SIBO often overlap with other gut imbalances like parasites, H. pylori, bacterial dysbiosis, yeast overgrowth and other digestive issues like lactose intolerance and fructose malabsorption. That’s why we believe it is best to get clarity and test, don’t guess.
I started out by guessing I had SIBO, and I was right. I ended up doing a test later on that confirmed it. But I chose not to retest after finishing my protocol and just moved on. If I had retested, I would’ve seen that the SIBO was still there. Twice I chose not to test and suffered through interventions that weren’t right for me because of missing information. I hope you can learn from my many mistakes! Testing allows us to:
Confirm whether SIBO is actually present
Identify which type of SIBO you have (hydrogen, methane, hydrogen sulfide or mixed)
Measure the elevations in gas levels, which influences how long intervention will likely take
Set a baseline to track progress over time
Getting a clear, positive SIBO test result is emotionally powerful stuff. Many of our clients talk about the relief they feel after years of unexplained symptoms, knowing it’s not ‘all in their head’ and that there is a real, measurable explanation for the bloating, gas, constipation/diarrhea, etc, they’ve been struggling with.
Breath testing explained
The most common and accessible testing method for SIBO is the breath test. It’s non-invasive (because an aspirate culture during endoscopy isn’t a fun alternative!), can be done from home, and is available through various labs posting a kit to you at home or home-testing devices.
Breath tests work by measuring hydrogen, methane and sometimes hydrogen sulfide gases, that are produced when microbes ferment sugars in your small intestine. These gases are absorbed into the bloodstream and are exhaled through the lungs and measured when we test for SIBO using a breath test.
Basically, you take a baseline breath sample, drink a sugar solution, called the test substrate, and then provide breath samples every 15-20 minutes for up to three hours.
We want to measure hydrogen and methane gas levels, and depending on symptoms, we may also want to measure hydrogen-sulfide gas. Most labs measure hydrogen and methane, like SIBOTest, Life Extension and Aerodiagnostics, however currently only one lab adds on hydrogen sulfide gas, which is very unstable and hard to measure. This is Gemelli Labs, and at present they are only offering their testing in the United States. Finally, there are devices you can purchase that allow DIY SIBO testing like FoodMarble. All of these testing options are useful and we have clients use them all.
Sugar substrate options
The three sugar substrates used in SIBO breath testing are lactulose, glucose and fructose. Research on the different sugars and which is best is ongoing, however there are two different variables to consider when choosing which sugar to use.
The first is how quickly the sugar you choose is absorbed in the small intestine. There are three sections of the small intestine - the duodenum, jejunum and ileum. And we can get SIBO overgrowth in all three sections. With this in mind, we ideally want a sugar that is not absorbed quickly at the start of the small intestine. We want a substrate that isn’t absorbed at all, or is absorbed slowly enough to feed microbes throughout the entire 6-7 metres of the small intestine.

The second consideration is picking a substrate that is actually fermented by the kinds of bacteria or archaea we’re looking to identify. Not all microbes ferment all sugars, so if you pick the wrong sugar substrate, the organisms you have overgrowing in your small intestine might not actually ferment it and produce any gas, meaning we get a false negative SIBO result. Basically you have an overgrowth, it just doesn’t show on your test.
Here is an overview of the pros and cons of each sugar substrate and when we use one over the other:
1. Lactulose
Lactulose is an artificial lab-made sugar that humans can’t digest. It basically passes unabsorbed through the whole small intestine and into the colon. This ability to pass through the whole small intestine without being absorbed is why it works so well as a SIBO testing substrate and is our first preference for testing with most of our clients. It works as a fuel source for overgrown bacteria and archaea through the whole small intestine and allows us to detect an overgrowth from top to bottom.
But, the challenge with lactulose is that it is only selectively fermented. That means that not all types of bacteria have the ability to eat it. And if they don’t eat it, they don’t produce gas that shows up as a rise on breath testing. In this case, you could have bacteria in large amounts in your small intestine, but you won’t see it on a lactulose breath test. Lactulose isn’t fermented by some species of Klebsiella and E.coli, bacteria responsible for hydrogen-dominant SIBO. So this means we’re potentially missing some of the species (but not all of them) responsible for hydrogen-dominant SIBO when we use lactulose. It works really well for methane-dominant SIBO which is caused by archaea, because they have no issues fermenting lactulose, like crazy.
Another downside of using lactulose for SIBO testing is that it can speed up how quickly things move through your gut. If lactulose causes rapid transit, it can trigger diarrhea and a misleading test result. That’s because once lactulose reaches the large intestine, where we naturally have lots of bacteria, it starts producing a lot of gas. Normally, this shouldn’t happen until after the 90-100 minute mark on a SIBO test, which helps us tell the small intestine from the large intestine. But if everything moves too fast, gas production in the large intestine can show up earlier, making it look like SIBO when it’s actually not.
We’ll talk more about this when we cover how to interpret a SIBO breath test lab result but just know that if your practitioner is a SIBO expert, they should know how to not fall for this type of false positive result.
Because lactulose is not well absorbed, it can be used as a laxative. That’s why some people experience the need to use the bathroom during or after SIBO testing. Sometimes clients can experience classic SIBO symptoms when testing, like bloating and gas, but other times they won’t experience any symptoms at all.
Despite all of this, we still prefer to use lactulose as our first preference for suspected SIBO and IMO, but may consider another substrate if we suspect hydrogen-dominant SIBO and a client has diarrhea as a main symptom.
And a final note about the lactulose sugar substrate is that it is not the same as lactose. Lactose is the sugar from milk, while lactulose is a synthetic disaccharide made of galactose and fructose. The lactulose that comes in the SIBO test kits is a 10 gram or 15 ml liquid solution that should be mixed with 8 oz. or 1 cup of water. This solution does contain 1.2 grams of lactose in it, so people who are severely lactose intolerant should ask their doctor if this test is right for them.
2. Glucose
The next option for SIBO breath testing is glucose. Unlike lactulose, glucose is highly absorbable. This means it really only measures overgrowths that exist in the upper part of the small intestine. This is because the glucose gets absorbed quickly in the upper part of the small intestine, meaning it never makes it down the full 6-7 metre length. So if the overgrowth you have is at the end or distal part of the small intestine, in the ileum for example, we wouldn’t pick this up with a glucose breath test.
It does mean that we don’t have the same risk of a false positive result that we see with lactulose because of a rapid transit time. In the case of glucose, the risk is a false negative result. As in you have SIBO, but it doesn’t show up on testing because the sugar never makes it to where the bacteria are overgrowing in the distant parts of your small intestine.
For this reason, we don’t use glucose for SIBO testing very often. But if you did choose to use it, you would need to consume 75g of glucose mixed into 8 oz. or 1 cup of water.
3. Fructose
Fructose is the last option and for a long time it wasn’t very commonly used. But some recent research has changed all of that and has indicated that it can actually pick up SIBO in cases missed by both lactulose and glucose. Particularly hydrogen-dominant SIBO.
This is because unlike lactulose, fructose is basically consumed by all types of bacteria and archaea. And unlike glucose, it is more slowly absorbed, which means it will make its way into the middle part of the small intestine, the Jejunum, and at least to some degree, the last part of the small intestine, the Ileum.
And in one clinical research trial that used all three sugar substrates, fructose was actually found to pick up SIBO in the most number of people tested. Note that another clinical trial by the SIBOTest lab in Australia found that lactulose was better at detecting SIBO-H, so we still need more data. If you choose to test with fructose you will need to consume 25g of fructose mixed into 8 oz. or 1 cup of water.
summary of the SIBO test substrates and when we would use them:
Lactulose: Not absorbed by the small intestine. It provides a full-length view of the small intestine but can trigger diarrhea or false positives in people with rapid transit time. It works especially well for methane SIBO/IMO (Intestinal Methanogen Overgrowth).
Glucose: Absorbed quickly, so it mostly tests the upper part of the small intestine. It’s less likely to give false positives, but may miss overgrowths further down.
Fructose: Slowly absorbed and fermented by a wider range of microbes. It can detect hydrogen-dominant SIBO cases that lactulose might miss. Especially helpful for people with symptoms but prior negative results with lactulose and glucose testing.
Our approach to choosing sugar substrates for SIBO TESTING
Our general approach for SIBO testing is to start with lactulose as our preferred test substrate and see what shows. If lactulose comes back negative, and there are no other clues to correlate with their symptoms from other lab testing, we may recommend testing for SIBO again using fructose to broaden our search.
We very rarely use glucose as our testing substrate of choice, however it can be helpful if a client can’t use or has a reaction to lactulose and fructose, or if they have tested with both and there was no gas elevation showing and we want to try another substrate, or if they have come to us with glucose testing that is positive and we want to retest using the same substrate.
Just remember that no testing is perfect but that using the right substrate can really improve your chances of getting an accurate result.
How to prepare for a SIBO breath test
Most SIBO breath testing companies have a detailed handout that will come with your test kit, covering everything you need to know to complete the test accurately. This can vary from lab to lab so your practitioner may give you some additional advice more specific to you. Based on our experience working with thousands of clients, here’s what you really need to know before testing.
When to test:
If this is your first time testing for SIBO, timing is important. You’ll want to wait at least 2 to 4 weeks after any major gut interventions like:
Colonoscopies
Barium studies
Colonics
Antibiotics
Herbal antimicrobials
These tests and interventions can temporarily lower the bacteria and archaea in your small intestine. If you test too soon, you might miss an overgrowth that’s still there, just temporarily suppressed.
If you're retesting for SIBO it’s a bit different. Your practitioner may actually want to test immediately after finishing antimicrobials or antibiotics, before any potential relapse can occur. We know some clients can relapse in as little as 3-5 days, especially if there is damage to the migrating motor complex (MMC), the muscle that sweeps bacteria and archaea out of your small intestine. For these clients we ask them to retest 1-3 days after finishing their SIBO intervention.
Supplements to avoid before testing:
To get the most accurate results, we typically recommend stopping the following supplements at least one day prior to testing:
Prebiotics and probiotics: including fermented foods like yogurt, sauerkraut and kombucha
Digestive aids: like enzymes, HCL and bitters
Binders: which can interfere with digestion and transit time
Stool softeners and constipation support products: ideally stop 1 day prior to testing, if this is possible.
Any other non-essential supplementation: such as liver supports, vitamins and minerals, etc.
You don’t need to stop any essential medications, but it’s worth checking with your practitioner if you’re unsure.
Most labs recommend you stop taking supplements or medications for constipation 1 week to 2 days prior to testing. Stool softeners are products like magnesium, vitamin C, Ducolax, Miralax, Senna, etc. That said, having worked with thousands of constipated clients we know this is not possible for everyone, so we try to have them stop stool softeners only 1 day prior to testing, while they do the SIBO test prep diet. We also like to have them down to magnesium as their only stool softener if this is possible. Again, it’s all very individualised, but for those who are very constipated, and this constipation is likely coming from methanogens or IMO, we want to get some sort of reading from a SIBO lab, even if this is not perfect. An imperfect SIBO lab is better than no SIBO lab when it comes to constipation!
Our Chronic Constipation Clear-out e-Guide outlines the exact strategies we use with clients to get things moving when nothing else works. Get it here: Constipation eGuide LINK
We used to recommend clients stop acid-suppressing medications like PPIs (such as Nexium) a week before testing, but we’ve changed our approach. Now, we aim for clients to pause PPI use 1 day before testing, if they can. A 2009 article in the American Journal of Gastroenterology found that PPI use didn’t affect the accuracy of SIBO breath tests in people with IBS symptoms. So unless your practitioner advises otherwise, you don’t need to stop PPIs a full week ahead. A brief pause the day before is often enough.
SIBO test prep diet
Now let’s talk about the SIBO test prep diet. This is probably one of the most important and misunderstood steps in the whole process.
The goal of the SIBO prep diet is to remove the foods that ferment and produce gas, which will reduce baseline gas levels in the gut. We don’t want these left over foods impacting the gas levels that show on the SIBO breath test. When you drink the sugar solution at the start of your test (lactulose, fructose or glucose), we can clearly measure how much gas is produced in response to that sugar and whether it’s being produced in the small intestine, where it shouldn’t be.
It’s typically a 1 day, or 24 hour, prep-diet, followed by overnight fasting, but for constipated clients who take constipation support supplements to go to the toilet, we often recommend a 2 day prep diet because of the potential for much slower gut transit time.
Foods to avoid on a SIBO prep diet: The gold standard is zero carbohydrates, just protein and fat, because it’s carbohydrates that ferment and create gas that could interfer with the results. That means avoiding:
Fruit
Vegetables
Grains
Legumes
Herbs and spices
Dairy (except for hard cheeses)
Juice
Sugar
Alcohol
There are a lot of options out there for SIBO test prep diets and they vary with the carbs you can include. As a clinic we like to start with the test prep options that come with the product you purchase and personalize specific to our clients needs. Carbs that you will typically see on the allowed foods list are white rice, white potato or white bread because of how little they are fermented and how quickly they are absorbed.
Sample SIBO breath test diet from SIBOTest in Australia:
Baked or broiled chicken, fish or turkey
Plain steamed white rice
Hard cheese (if tolerated)
Eggs
Clear meat broth
Olive oil (max 1 tbsp)
Salt and pepper seasoning
Weak black tea or coffee
Plain water. Delicious!
It can get tricky for people with diabetes and so your practitioner will be able to assist here with recommendations for lower fermentable carbs that won’t impact the testing and also help regulate blood sugar levels prior to testing.
Multiple test kits and an extended prep diet: If you have more than one SIBO breath test to complete, such as lactulose, fructose and glucose test kits, it is important to stay on the SIBO prep diet between tests. It may look something like this:
Day 1: Prep diet and overnight fasting
Day 2: Complete the glucose test kit then continue the prep diet and overnight fasting
Day 3: Complete the lactulose test kit then continue the prep diet and overnight fasting
Day 4: Complete the fructose test kit, then you are back to your normal diet and supplement routine.
With that, we’ve covered the prep, and now let’s go through how to actually do the test.
How to complete a SIBO breath test at home
Before you start your SIBO breath test, you want to read through the preparation guidelines and instructions that come with your specific test. You also want to make sure everything that is supposed to be in the kit is in there. You will have:
10 test tubes
10 test tube labels (if you are completing the 2 hour test you will have less)
Test substrate: lactulose, glucose or fructose
Collection device
Testing referral form for you to fill out
Return box and envelope
If you have everything in your kit, and you’ve completed all of the test prep, such as stopping any supplements and completing the SIBO prep diet, then you’re good to start the test.
Because you need to fast for 12 hours prior to testing, it’s easiest to complete the SIBO breath test first thing in the morning, ideally 1 hour or more after waking and brushing your teeth. It’s actually recommended you brush your teeth without toothpaste and just rinse with water afterwards. This helps to reduce any high gas levels coming from bacteria or archaea in your mouth.
A few other things to avoid in the morning and during the testing period are:
Smoking
Exercising
Sleeping
Mints or anything else other than small sips of water.
Step 1:
The first thing you need to do is mix up your substrate of lactulose, glucose or fructose with 1 cup of water, following the instructions on your kit. But do not drink this just yet. Now you’re ready to take your baseline breath sample. This is the sample we take before drinking the solution.
Step 2:
To collect your baseline breath sample, hold the collection device in one hand and the test tube in the other. Hold the test tube close to the needle but do not puncture it yet.
Take a normal breath in, put your mouth over the mouthpiece of the collection device and blow out normally. You will inflate the collection bag with your breath. There is a small hole in the collection bag so this will leak a small amount of air. This is normal and what we want to happen.
Mid breath, and when the collection bag is fully inflated, push the test tube onto the needle firmly so the rubber stopper on the test tube is punctured for about 1 to 2 seconds. Next, take the test tube off the needle before you finish your breath. This is really important. Make sure you have collected 1-2 seconds of breath and have removed the test tube before you stop blowing out. These are self-sealing tubes so once your breath is in there it will stay in there.
When you finish collecting your Baseline breath sample, write the collection time, date, number and your name on the label and affix it to the tube and place it to the side so it doesn't get mixed up or reused.
I have a video on Youtube about SIBO breath testing that shows me using the collection device. You can view it below (making sure you start at 10:48 timestamp.)
Step 3:
Now it’s time to drink your pre-prepared substrate solution. Try to do this within 3-5 minutes of mixing. After you drink your substrate solution, set your timer for 15 or 20 minutes. Collect your second breath sample 15 or 20 minutes after finishing your substrate solution.
All samples must be collected at 15 or 20 minute intervals until all 10 samples have been collected. Your practitioner will give you guidance on timing, but if you’re not sure, go with 20 minutes. If you collect a sample late please make sure the next sample follows the original time schedule.
Take the time between samples to label each test tube accurately with the sample number and other required information such as your name, date and substrate solution if required on each test tube.
Step 4:
When you have collected and labelled all of your samples, put them into the bubble wrap return bags and place them back in the test kit box. Make sure to include your referral form and post the test kit back to the lab for analysis ideally within 3 days of collecting your breath samples. Most breath samples are viable for up to 14 days after collection.
Completing the test on a Sunday and posting it Monday is typically the best timing to ensure it is received by the lab as soon as possible from the time of collection. For most people, the weekend is also an easier time to do the collection so that they can put aside three hours with less interruptions, and also if you have SIBO, you will likely get symptoms from completing the test. Having diarrhea, gas or bloating after testing is typically easier to deal with when you have more control over your time.
Once you’ve sent your test kit back, you can expect results within 1 to 2 weeks, depending on the lab you have used.
Common testing mistakes to avoid when doing a SIBO breath test
After all the prep and planning, the last thing you want is to make a mistake and your samples can’t be used. To save you that frustration, and the cost of repeating the test, here are the most common mistakes we see and how to avoid them.
1. Not getting the prep diet right
The first is making sure you get the prep diet right. If you eat the wrong foods or continue taking supplements during the prep phase, bacteria and archaea in your gut will start producing gas before the test even begins. That means your test might show a high baseline or early gas rise that isn’t from SIBO, it’s just from yesterday’s meal. This can lead to a false-positive result and make it hard to know what’s really going on in your small intestine.
With incorrect test prep you might see a baseline reading that starts high and either stays high or slowly declines during the first 60 minutes, which makes it hard to see any real SIBO-related gas spikes. We highly recommend our clients plan ahead for SIBO testing. Know what you’re eating, what you’re not and what time to test. If you’re unsure about a food or supplement, ask your practitioner. It’s much easier to clarify in advance than to redo the test later.
2. Rushing the breath sample collection process
The second is the actual breath collection process itself. It can be challenging and feel awkward, trying to line everything up, and you might be feeling the pressure of wanting to do it right.
If you’re feeling nervous take a moment to pause before each sample. You don’t need to rush. Take a few slow breaths, read through the instructions again, and trust yourself. Push the test tube onto the needle firmly and mid-breath. Hundreds of thousands of people have done it before you, and you absolutely can too.
3. Mixing up the labels on test tubes
You’ve done all the hard work and collected your samples, but if your labels are out of order or missing key info, the lab won’t be able to analyze your test accurately.
We’ve seen cases where clients labeled everything before the test and then accidentally grabbed the wrong tube, or forgot which number they were up to halfway through. Our best advice is to label each test tube immediately after collecting the sample, not before. You’ve got plenty of time between breath samples to do this carefully.
You will need to include:
Name
Date
Time
Sample number (this is the most important part!)
The sample number tells the lab exactly where in the timeline that sample fits. Without it your results could be unusable or misinterpreted.
Getting a valid result really comes down to three things: prep well, breathe calmly, and label carefully. Do those three, and you’re setting yourself up for a clear, accurate result your practitioner can actually use. You’ve got this!
How to read a SIBO breath test
Before we jump into interpretation, let’s start by understanding the information listed on a typical SIBO breath test report.
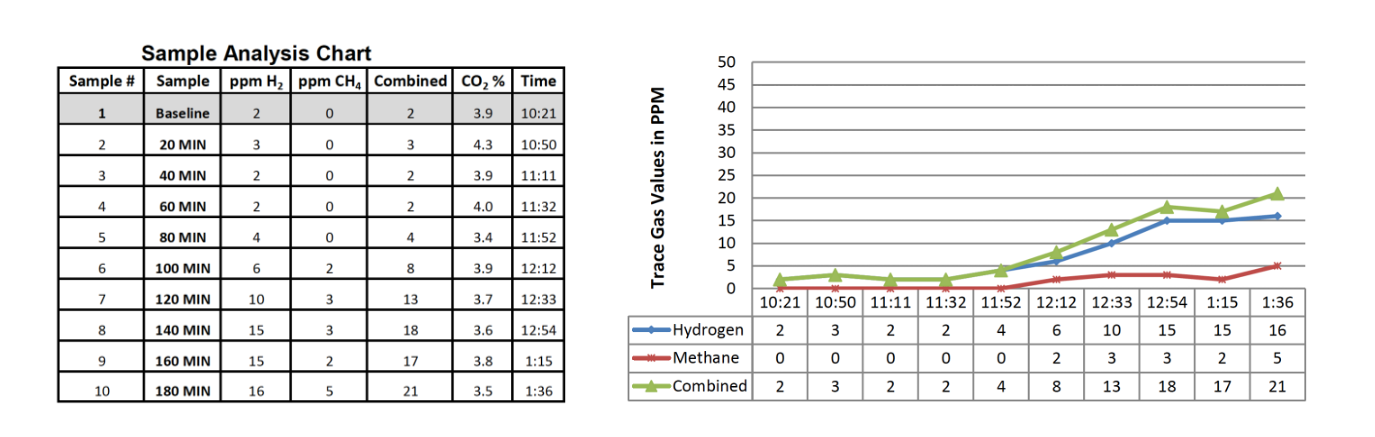
Your report will likely have both a graph and a table with information for you to review like this one pictured from SIBOTest. The graph is a visual representation of the information in the table, so let’s chat through the table first.

Your SIBO breath test report starts with a column that lists the sample numbers. Next is the sample time interval, starting with a baseline reading, then listing samples every 20 minutes for a 3 hour period on this report. These intervals help us track how gas levels on the breath change over time after consuming the sugar substrate.
The next 2 columns on this SIBO report list gas levels for hydrogen and methane gas and tell us if you have an elevation that indicates a positive SIBO breath test result.
The baseline level, which is on the top row of the table, represents the levels of hydrogen and methane on your breath before you ingest the sugar solution. These baseline levels give us a starting point to measure gas level changes over time.
The final column is the percentage of carbon dioxide in your breath sample. It’s used as a measure of whether the sample is valid and was collected in the right way. This number is normally between 3-4%. If this level is below 1.5 or over 5.5% the sample ideally shouldn’t be used.
Let’s focus back in on the hydrogen and methane columns. They report the levels of hydrogen, methane and in some tests hydrogen sulfide gas in PPM. PPM stands for parts per million, which is a way to measure the concentration of gases in your breath. It’s an important measure because it quantifies how much hydrogen or methane gas is being produced by bacteria or archaea in your gut. The higher the number, the more gas those bacteria or archaea are producing.
In addition to the table, most SIBO breath test reports include a graph that plots gas levels against time. On the horizontal X-axis, you have the time intervals, and on the vertical Y-axis, you have the concentration of gases in parts per million. The time intervals are either expressed as the test tube number starting from 1 as the baseline, the actual time of day each sample was taken, or as the time increment such as 20 minutes, 40 minutes, 60 minutes, etc.
How to interpret SIBO breath test results
We base our SIBO lab interpretation off the North American Consensus guidelines. The alternative is the European Consensus, which is different and more conservative as they aim to decrease the amount of false-positive results. We also consider a client’s health history, symptoms and their lab results together to be really thorough.
The North American Consensus guidelines report a positive SIBO breath test as:
Hydrogen positive: a 20ppm rise from baseline within 90 minutes
Methane positive: 10ppm at any point during testing, including baseline
Hydrogen sulfide: is not actually addressed in the North American Consensus.
After working with thousands of SIBO clients we have made a few adaptations to simplify interpretation and reflect what we see clinically, so here is what we actually use when interpreting a client’s SIBO results:
Hydrogen-SIBO (SIBO-H)
Positive if: Hydrogen levels reach 20ppm or higher within 90-100 minutes.
For constipated clients, we may extend that window to 120 minutes.
A flat hydrogen baseline is ideal (less than 5-10ppm) to rule out prep issues.
Methane-SIBO (IMO)
Positive if: Methane levels reach 10ppm or higher at any point.
A methane baseline above 10ppm is already considered positive for IMO.
We may also consider 3-9ppm for a client who has chronic constipation and no other clues to explain their symptoms. Low gas level clients may still have severe symptoms.
Hydrogen sulfide-SIBO (SIBO-H2S)
Positive if: Hydrogen sulfide is 3ppm or higher within 90-100 minutes, and up to 120 mins for those who are constipated (Trio-Smart only).
Or, a flatline in both hydrogen and methane (less than 3-6ppm) throughout the entire test if hydrogen sulfide gas isn’t tested and symptoms correlate.
The theory behind why we use a flatline of both hydrogen and methane gas as a clue for hydrogen sulfide SIBO is that hydrogen sulfide producing bacteria consume all of the hydrogen that is made by bacteria and used by archaea to make methane and convert it all to hydrogen sulfide gas, so the flatline is what we are left with on our report.
Applying the SIBO test interpretation guidelines
Now let’s look back to the lab test report above and apply our guidelines to see whether we would consider this a positive or negative SIBO test result.
As you look at the graph, you’ll see a blue line representing hydrogen gas, and a black line for methane gas. Normal baseline levels for hydrogen and methane in a fasted state are low. After ingesting the sugar solution, we typically expect to see a small rise in these gases as the solution travels through the digestive system, even when there is no SIBO present. However, a significant rise is a different story.
For hydrogen, we’re looking for a level of 20 ppm or more within the first 90-100 minutes. The idea here is that hydrogen-producing bacteria ferment the sugar solution rapidly as it passes through the small intestine. Anything from 90-100 minutes onwards can be considered large intestine time, depending on the transit time of the person taking the test. This is why that 100-120 minute range is referred to as the transition between small and large intestine and also why we might consider an elevation during this time for a client who has slower motility and is very constipated, as a positive SIBO result.
This report shows hydrogen gas levels starting at 3ppm from baseline and rising to 23ppm by 80 mins. So, this lab is positive for hydrogen-SIBO using our criteria.
For methane, a result of 10 ppm or more at any point is indicative of SIBO. Methane-producing archaea slow down intestinal transit time, which we need to take into account when looking at a client’s lab results. This report shows a baseline methane of 18ppm, that stays around this level for the full 3 hour testing period. This is considered positive for methane SIBO or intestinal methanogen overgrowth (IMO).
Now let’s look at some more example labs that show positive results for SIBO.
1. SIBO-H example: This client had a rapid rise in hydrogen levels exceeding 20ppm within the first 40 minutes. This is a classic SIBO result and suggests that an overgrowth of hydrogen-producing bacteria is fermenting the sugar substrate quickly as it travels through the small intestine. These high levels typically correlate with symptoms like bloating and diarrhea, which was true for this client.

2. IMO example: A baseline methane level of 10 ppm or higher is a strong indicator of methane-dominant SIBO or IMO. A high baseline suggests a significant presence of methane-producing archaea. This client has a methane level of 33ppm from baseline and it rises above the limits of this lab, which is 81ppm from 60 minutes onwards. This pattern is often associated with constipation, bloating, gas and slower intestinal transit time.

3. SIBO-H2S examples: Now we will look over 2 different labs that indicate hydrogen-sulfide SIBO. First we have a lab that doesn’t measure hydrogen-sulfide gas but shows a flatline in both methane and hydrogen gas. You can see the parts per million reading doesn’t get higher than 3 in both columns. This can be considered as a strong clue for hydrogen-sulfide SIBO when correlated with a client’s symptoms.
To be more confident you can use the only lab currently available which measures hydrogen sulfide gas - the TrioSmart breath test. In this lab you can see we have a positive hydrogen sulfide gas level above 3ppm. This lab shows a high baseline that stays high and around 10ppm through the whole testing period. Clients typically present with diarrhea, bloating and gas, although not always. We have seen clients with elevated hydrogen-sulfide gas levels on SIBO breath testing who are constipated, which was interestingly the case for this client.


4. Improper test prep example: Hydrogen is very elevated from baseline at 32ppm and then it drops quickly and doesn’t elevate again in the small intestine. This is common when the test prep process hasn’t been followed correctly. It was really hard to find a lab with improper test prep because our clients are just so good at it! This lab was from 2020, for a client that came to us with testing they had completed themselves.

5. SIBO negative example: It’s helpful to see what a negative SIBO breath test results looks like. This is what we are aiming for after we have completed interventions and addressed SIBO root causes. This client had very elevated hydrogen and methane gas levels on their first test. You can see that this retest shows hydrogen is below 20ppm and methane is below 10ppm within the first 80-100 minutes. Overall, this shows hard work come to life for a now symptom-free client!
Interpreting beyond the numbers
At The Functional Gut Health Clinic, we’ve reviewed thousands of SIBO tests. Here are a few key insights from experience:
Symptoms don’t always match gas levels. Someone with low gas numbers might actually have severe symptoms, and vice versa. You need to address the whole picture - symptoms, lab results and more.
Transit time matters. A delayed rise in gas doesn’t mean it’s not SIBO. It may just be happening in the distal small intestine of someone who has very slow transit time or constipation.
Flatlines matter. Especially with hydrogen sulfide symptoms; we take flat gas levels seriously.
SIBO can shift. It’s not unusual to address one gas type, such as methane, and see another, such as hydrogen, increase on retesting.
Borderline cases may point to other root causes, like parasites, mold or vagus nerve dysfunction, rather than SIBO itself.
Final thoughts: use testing to guide, not define
SIBO breath testing is a powerful tool, but it’s just one piece of the gut health puzzle. A good test result informs strategy, but your symptoms and health history always provide more important context about what might be going on in your gut.
If you're unsure whether testing is right for you, or you’ve tested before but felt lost in the process, know that support is available. At The Functional Gut Health Clinic, we specialize in interpreting SIBO labs, identifying root causes, and creating personalized protocols to help you move forward with clarity and confidence.
Ready to take the next step? Book a free 15 min pre-consult with our team today.
References:
Bures, J., et al. (2010). Small intestinal bacterial overgrowth syndrome. World Journal of Gastroenterology : WJG, 16(24), 2978–2990
Saad, R., Chey, W. (2014). Breath testing for small intestinal bacterial overgrowth: maximizing test accuracy. Clin Gastroenterol Hepatol, 12(12), 1964-72
Posserud, I., Stotzer, P., Björnsson, E. S., Abrahamsson, H., & Simrén, M. (2007). Small intestinal bacterial overgrowth in patients with irritable bowel syndrome. Gut, 56(6), 802–808
Simrén, M., & Stotzer, P. (2006). Use and abuse of hydrogen breath tests. Gut, 55(3), 297–303
Gorbach SL. Microbiology of the Gastrointestinal Tract. In: Baron S, editor. Medical Microbiology. 4th edition. Galveston (TX): University of Texas Medical Branch at Galveston; 1996. Chapter 95
Ghoshal, U. C. (2011). How to Interpret Hydrogen Breath Tests. Journal of Neurogastroenterology and Motility, 17(3), 312–317
Pimentel, M., et al. (2015). Development and Validation of a Biomarker for Diarrhea-Predominant Irritable Bowel Syndrome in Human Subjects. PLoS ONE, 10(5), e0126438.
About author: Bella Lindemann, FDN-P
Bella Lindemann is the founder and lead practitioner of The Functional Gut Health Clinic. With her science degree, functional nutrition certification and extensive experience, she is a recognised expert in gut health and the science of SIBO. Having worked with hundreds of methane SIBO cases, including her own, Bella is passionate about helping her clients address this imbalance and take back control of their digestive symptoms.